Browsing the archives for the BitmapData category.


Asciify – Actionscript 3 (as3) Ascii Art class

actionscript 3, ascii art, BitmapData, classes

There are trends on the web (as in real world) that last days or weeks and there are things that became a classic form of expression of the geek culture and are still interesting to explore after 20+ years.

Ascii Art is one of these things. If you don’t know what ascii art is you’re probably reading the wrong blog, however for the one or two that doesn’t know about it, here you can learn more about it: Ascii art on wikipedia.

I always had in mind the idea to create an actionscript class to render ascii art from pictures and now with as3 this is going to be possible at decent speed.

My class is called Asciify and it can actually “ascii-fy” every DisplayObject instance on the display list.

Usage is very simple and it’s actually REALLY fast.
Didn’t think AVM2 could asciify a video in real time but I was wrong. You cannot go further certain resolutions but if you stay on small videos with decent detail 30fps are guaranteed.

This is the constructor method:

public function Asciify(targetClip:DisplayObject, tformat:TextFormat, pixelSize:Number=8, negative:Boolean=false) {

and this is a sample usage:

var asciifyInstance:Asciify=new Asciify(picture, textFormat, 16);
addChild(asciifyInstance);

Demos & download

See a working demo here:
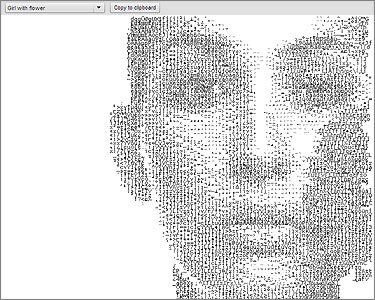
Asciify class test demo 1
Pictures demo

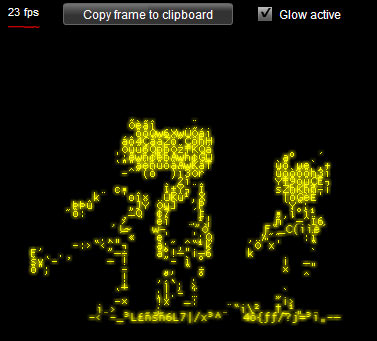
Another demo applied to a video (see original video here)… this demo uses a glow effect too that make you loose a couple o fps but I couldn’t resist:

Asciify class test demo 2
Video demo

You can offcourse apply it to an animated movieclip or anything else.
In this demos I use ProggyCleanTT font, but you can use any monospaced font that must be imported into the library and have a linkage (in this case I gave it “Font1″ linkage name).
Then just play a little with size, leading and kerning of the textformat to achive the desired effect.

Here is the class:

Asciify class download

Just extract it to [your custom classes folder]/com/oaxoa/fx/

Here is the code for the video demo:

import fl.controls.Button;
import flash.events.Event;
import flash.text.TextFormat;
import flash.filters.GlowFilter;
import fl.controls.CheckBox;
import com.oaxoa.fx.Asciify;
import com.oaxoa.components.FrameRater;

var glow:GlowFilter=new GlowFilter(0xffff00);

/*******************************************/

// setup the TextFormat object to use
var font:Font=new Font1();
var textFormat:TextFormat=new TextFormat();
textFormat.font=font.fontName;
textFormat.size=16;
textFormat.leading=-9;
textFormat.color=0xffff00;

// create an istance of the class and add a nice glow filter
var asciifyInstance:Asciify=new Asciify(video, textFormat, 6);
asciifyInstance.y=30;
asciifyInstance.filters=[glow];
addChild(asciifyInstance);

// update asciifyInstance at every frame
addEventListener(Event.ENTER_FRAME, onframe);

function onframe(event:Event):void {
	asciifyInstance.render();
}

/*******************************************/

// just add some interface for the demo
// you don't really need stuff below this line

var interfaceFormat:TextFormat=new TextFormat();
interfaceFormat.color=0xffffff;
interfaceFormat.size=12;

var cb:CheckBox=new CheckBox();
cb.label="Glow active";
cb.y=4;
cb.x=260;
cb.setStyle("textFormat", interfaceFormat);
cb.selected=true;
addChild(cb);

cb.addEventListener(Event.CHANGE, oncb);

function oncb(event:Event):void {
	cb.selected ? asciifyInstance.filters=[glow] : asciifyInstance.filters=[];
}

var button:Button=new Button();
button.label="Copy frame to clipboard";
button.y=4;
button.x=70;
button.width=170;
button.setStyle("textFormat", interfaceFormat);
addChild(button);

button.addEventListener(MouseEvent.CLICK, onclick);

function onclick(event:MouseEvent):void {
	asciifyInstance.copyContentsToClipboard();
}

var fr:FrameRater=new FrameRater(0xffffff);
fr.x=10;
fr.y=4;
addChild(fr);
52 Comments

Actionscript 3 – PixelMorphing class first test (morphing with particles)

actionscript 3, BitmapData, classes, morphing, Particles

Hi there,
I am back after some pause with this interesting effect. This class takes every pixel from two pictures, sort them by averaged luminosity e reconstruct the second picture animating pixels from the first one.

The effect is a very nice pixel morphing (particles morphing) and the final result resambles some color ramp recolor tecnique.

pixelmorphing_test.jpg
Start demo

This is the second algorythm I wrote. The first one was build to do the calculation about moving pixels and then draw the full picture parsing the full array of pixels. The bigger problem in the first one was speed of execution.

The setPixel method of the BitmapData class is far too slow for this kind of effect and even slower was the parsing every frame of the full array containing all the pixel of the first image.

So I come with completely new algorythm that uses three bitmaps/bitmapdatas where the first only displays original image and set to trasparent only pixels that have moved away.
The scond one redraws every frame, but only displays moving pixels which are stored in a much shorter array and the last one shows only pixels which reached the final position.

With this second approach only pixels effectively changing are redrawn and a lot of speed can be gained.

This first post is only for showcase, during next days I will write a technical post about class structure, speed optimisations etc. off course with source code.

Don’t forget to leave a comment if you like it ;-)

22 Comments

Actionscript 3 fluids simulation

actionscript 3, BitmapData, fluids, simulation

Hi there, sorry for not posting for a while but have been days really full of work.
I find some time now to post a new experiment I did some week ago.

I was searching about fluids simulation and I found a lot of interesting studies from Jos Stam including this document entitled “Real-Time Fluid Dynamics for Games“.

Then I found a post on Nulldesign.de about a java fluid solver he found which is implementing the same routines from Jos Stam.

So I simply trashed my evolving algorythm and translate the java one into AS3 eliminated the walls calculation (I don’t like small spaces) and added a blur filter.

The result is quite interesting and you can see it here.

fluidsolver.jpg
See it in action
.

Simply click and drag for a while to add some fluid into the running simulation. Better looking when adding many times a little quantity in different places.
Press SPACE to reset simulation.


The main delusion was about speed. Ok, the actionscript virtual machine 2 (AVM2) is incredibly faster than AVM1 and the bitmapData class too, but stil not enough to compete with java. The most funny thing is that in the original document “Real-Time Fluid Dynamics for Games” at page 6, there the following loop:

void diffuse ( int N, int b, float * x, float * x0, float diff, float dt ) { 
	int i, j, k; 
	float a=dt*diff*N*N; 
	 
	for ( k=0 ; k<20 ; k++ ) { 
		for ( i=1 ; i<=N ; i++ ) { 
			for ( j=1 ; j<=N ; j++ ) { 
				x[IX(i,j)] = (x0[IX(i,j)] + a*(x[IX(i-1,j)]+x[IX(i+1,j)]+ x[IX(i,j-1)]+x[IX(i,j+1)]))/(1+4*a); 
			} 
		} 
		set_bnd ( N, b, x ); 
	} 
} 

Notice the main for loop starting from k=0 and ending with k=20?
I thought this was used to average the relaxation routine result on 20 samples or something similar but if you look at it better you will see than there are no increments, decrements or averaging functions, but just simple value assignment and not using k index at all.

In the java fluid solver the same loop is implemented (and the result is still faster than mine in as3 :-( ). I simply totally removed the k loop and gained 20x speed with (apparently) no cons.

However the main coclusion is that Java is still a lot faster on some math operations and pixel access as described in this comparison paper i found.

Here is the as3 fluid solver class.

Extract it to your as3 classes dir after creating this path:
com/oaxoa/misc/

This class doesn't render or manage user interaction, just solve the fluids interactions in a linearized matrix. To see something on the screen you just need some lines to manage the data. I am actually to busy/lazy to wrap this into a class, maybe I will do, until then just paste this code to the main timeline:

import flash.display.Bitmap;
import flash.display.BitmapData;
import flash.display.Sprite;
import flash.geom.Rectangle;
import flash.events.KeyboardEvent;
import flash.filters.BlurFilter;
import com.oaxoa.misc.FluidSolver;
import com.oaxoa.components.FrameRater;

// frame dimensions (dxd pixels)
var d:int = 200;

// solver variables
var n:int = 40;
var dt:Number = 0.52;
var fs:FluidSolver = new FluidSolver();

// mouse position
var xOld:int;
var yOld:int;

// cell index
var tx:int;
var ty:int;

// cell dimensions
var dg:int;
var dg_2:int;

// cell position
var dx:int;
var dy:int;

// fluid velocity
var u:int;
var v:int;
var c:int;

var blur:BlurFilter=new BlurFilter(5,5,5);
var bd:BitmapData=new BitmapData(d,d, false, 0x000000);
var bmp:Bitmap=new Bitmap(bd);
bmp.filters=[blur];
var holder:Sprite=new Sprite();
holder.addChild(bmp);
addChild(holder);

var fr:FrameRater=new FrameRater(0xffffff, true);
fr.y=10;
addChild(fr);

function reset():void {
	dg   = d  / n;
	dg_2 = dg / 2;
	fs.setup(n, dt);
}

function paint():void {
	var c:int;
	// clear screen
	bd.fillRect(new Rectangle(0, 0, d, d), 0x000000);

	fs.velocitySolver();
	fs.densitySolver();
	for (var i:int = n; i >= 1; i--) {
		// x position of current cell
		dx = int(( (i - 0.5) * dg ));
		for (var j:int = n; j >= 1; j--) {
			// y position of current cell
			dy = int(( (j - 0.5) * dg ));
			// draw density
			var dd:Number=fs.d[I(i, j)];
			if (dd > 0) {
				var r:Number=dd*255;
				if(r>255) r=255;
				c = r << 16 | r << 8 | r;
				if (c < 0) {
					c = 0;
				}
				bd.fillRect(new Rectangle(dx-dg_2, dy-dg_2, dg, dg), c);
			}
		}
	}
}

reset();

addEventListener(Event.ENTER_FRAME, onframe);
function onframe(event:Event):void {
	paint();
}

stage.addEventListener(KeyboardEvent.KEY_UP, onkeyup);
function onkeyup(event:KeyboardEvent):void {
	if(event.keyCode==32) reset();
}
var adding:Boolean=false;
holder.addEventListener(MouseEvent.MOUSE_MOVE, onmove);
holder.addEventListener(MouseEvent.MOUSE_DOWN, ondown);
holder.addEventListener(MouseEvent.MOUSE_UP, onup);
function ondown(event:MouseEvent):void {
	adding=true;
}
function onup(event:MouseEvent):void {
	adding=false;
}
function onmove(event:MouseEvent):void {
	if(adding) {
		tx=int(mouseX/dg);
		ty=int(mouseY/dg);
		if(tx>n) tx=n;
		if(tx<1) tx=1;
		if(ty>n) ty=n;
		if(ty<1) ty=1;
		
		fs.dOld[I(tx, ty)]=30;
	}
}

// util function for indexing
function I(i:int, j:int):int {
	return i + (n + 2) * j;
}


If you want to discuss about this just leave a comment.

Anyway, just thought I'd share with you guys, I'm thinking of getting a reseller hosting plan so I can enhance the perfomance of the site and start my own hosting business, maybe in the future.

17 Comments

Actionscript 3 blobs / lava lamp effect

actionscript 3, BitmapData, perlinNoise, threshold

Here we are with a new as3 experiment.
This time I wanted to try to simulate some mercury-like fluid with its blobby aspect that resembles some sort of lava lamp.

Off course everything animated.


See this in action

This tecnique is quite simple, you just need some fantasy to reach the final effect:

  1. Create two BitmapData
  2. Create a Bitmap object linked to one of the BitmapData and add to the display list
  3. Apply a PerlinNoise with two octaves to the first (hidden) BitmapData
  4. Use the threshold method on the second (displayed) BitmapData
  5. Add some ubercool filters
  6. Animate everything on a frame based event
  7. Enjoy the magic

Here is the code:
(I will post the FrameRater class soon, until that just comment relatives lines and as usually remember to drop an instance of the components used (checkBox, slider) to the library before compiling or flash won’t be able to attach them dinamically)

import flash.display.Shape;
import flash.events.Event;
import flash.display.Bitmap;
import flash.display.BitmapData;
import fl.controls.Slider;
import fl.controls.CheckBox;
import flash.geom.Rectangle;
import flash.geom.Point;
import flash.filters.BevelFilter;
import flash.filters.BlurFilter;
import flash.filters.GlowFilter;
import com.oaxoa.components.FrameRater;

var w:Number=300;
var rect:Rectangle=new Rectangle(0,0,w,w);
var point:Point=new Point(0,0);
var a:Array=[new Point(1,1), new Point(3,3)];

var bd:BitmapData;
var bd2:BitmapData;
var bmp:Bitmap;

var bevel:BevelFilter;
var blur:BlurFilter;
var glow:GlowFilter;

var shape:Shape;
var ns:Slider;
var cb:CheckBox;
var fr:FrameRater;

initFilters();
initBmp();
initInterface();

function onframe(event:Event):void {
	a[0].x+=1;
	a[0].y+=1;
	a[1].x+=2;
	a[1].y+=0;
	bd.perlinNoise(105,105,2,0,false,true, 7, true, a);
	bd2.fillRect(rect, 0x00000000);
	bd2.threshold(bd, rect, point, ">", ns.value/255*0xffffff, 0xffff8000, 0x00ffffff, false);
}

function initBmp():void {
	bd=new BitmapData(w,w);
	bd2=new BitmapData(w,w);
	bmp=new Bitmap(bd2);
	bmp.filters=[blur, bevel, glow];
	addChild(bmp);
	addEventListener(Event.ENTER_FRAME, onframe);
}

function initFilters():void {
	bevel=new BevelFilter();
	bevel.blurX=bevel.blurY=20;
	bevel.distance=10;
	bevel.highlightColor=0xffffff;
	bevel.shadowColor=0xCC0000;
	blur=new BlurFilter(2,2);
	glow=new GlowFilter(0xFFAA00, 1, 20, 20, 2, 1, false, false);
}
function initInterface():void {
	// draw the white bar
	shape=new Shape();
	shape.graphics.beginFill(0xffffff, .75);
	shape.graphics.drawRect(0,0,w,30);
	shape.graphics.endFill();
	shape.y=w-30;
	// create slider
	ns=new Slider();
	ns.x=80;
	ns.y=w-18;
	ns.minimum=0;
	ns.maximum=255;
	ns.value=150;
	ns.snapInterval=1;
	ns.liveDragging=true;
	// create checkbox
	cb=new CheckBox();
	cb.label="Use filters";
	cb.selected=true;
	cb.x=200;
	cb.y=w-27;
	cb.addEventListener(Event.CHANGE, switchFilters);
	// create FrameRater
	fr=new FrameRater();
	fr.y=w-30;
	// add iutems to display list
	addChild(shape);
	addChild(ns);
	addChild(cb);
	addChild(fr);
}

function switchFilters(event:Event):void {
	event.currentTarget.selected ? bmp.filters=[blur, bevel, glow] : bmp.filters=[blur];
}

Important: don’t know why but i found a little bug in the flash CS3 actionscript editor. If you try to autoformat the above code the function switchFilters will be messied up. The line using the ternary operator (just a simpler way to write an if) will be pushed out of the curly brace so pay attention… just like you should in setting up your own virtual dedicated server hosting services.

12 Comments

Actionscript 3 Videowall / Videotexture

actionscript 3, BitmapData, video

Here I am with my first experiment on this blog.

I was trying to get a videowall effect by displaying many times the same video tiled on X rows and columns.

The bad one…

The logic says to create N*N Video Class instances and position them dinamically with a double for loop on rows and columns.
Alternatively we can speed up things by using the FLVPlayback component so we don’t need to manage connections and NetStream objects.

As I expected that couldn’t be that simple. Just with 10*10 (100 for non-math guys :-) ) wall the frame rate is fast dropping and audio and video desynch issues appear. Another point is that you have to manually mute all FLVPlayback/Video instances except one for having one single audio playback.

Here is the “bad” code:

/*
SUMMARY:
This example will try to create a video wall instancing many times the FLVPlayback component with the same video source.
Results are very poor performances and audio sync issues.
*/

import fl.video.FLVPlayback;

/* set the number of horizontal and vertical tiles
a matrix of tiles*tiles instances will be created
try with very low numbers to avoid crashes.
A value of 10 will produce (10*10=) 100 instances of the FLVPlayback on the stage 
 */
var tiles:uint=4;

// get stage size for tile size calculating
var sw:Number=stage.stageWidth;
var sh:Number=stage.stageHeight;

// calculate the size of a single tile
var vw:Number=sw/tiles;
var vh:Number=sh/tiles;

// perform a double cicle on rows and columns
for (var i:uint=0; i

If you use FLVPlayback as I do in the above code just remember to drop the component in the library before compiling the movie or flash will not be able to attach it dinamically.

And here is the (almost) working example.

As you can see videos are not perfectly synchronized and just raise a little the tiles number to make everything laggy.


...and the good one

Ok, now the better idea in another picture and few words:

  1. Add a single FLVPlayback instance
  2. create e bitmapdata and a bitmap to display it
  3. add a frame based event to apply the draw() method of the bitmapdata to the video instance N*N times at everyframe with a translation matrix to set the position of every tile.
  4. add the bitmap to the stage and hide the FLVPlayback instance.
  5. Enjoy

I really couldn't believe how the new AS3 bitmap engine can perform well once again. I have added a numeric stepper to let you dinamically change the tiles number and test it yourself. I set the limit to 50*50 (2500!) tiles and on my old Athon XP 3200 it just shows a little of audio stuttering when reaching that limit.

Here is the well working example,

and here comes the code:

/*
SUMMARY:
This example will use a single bitmap and the bitmapdata draw() method to render everyframe the video content as texture
*/

import fl.video.FLVPlayback;
import fl.video.VideoScaleMode;
import flash.display.Bitmap;
import flash.display.BitmapData;
import flash.geom.Matrix;
import fl.controls.NumericStepper;

// get stage size for tile size calculating
var sw:Number=stage.stageWidth;
var sh:Number=stage.stageHeight;

var tiles:uint;
var vw:Number;
var vh:Number;

// create a single instance of the FLVPlayback component
var video:FLVPlayback=new FLVPlayback();
video.source="onepiece.flv";
video.scaleMode=VideoScaleMode.EXACT_FIT;
video.seek(7);
// add to stage the newly created FLVPlayback instance
addChild(video);
video.visible=false;

// create the destination bitmap/bitmapdata
var bdata:BitmapData=new BitmapData(sw, sh, false, 0xeeeeee);
var bitmap:Bitmap=new Bitmap(bdata);
addChild(bitmap);
// perform a double cicle on rows and columns


function setTiles():void {
	// get the tiles number from the NumericStepper value
	tiles=stepper.value;
	// calculate the size of a single tile
	vw=sw/tiles;
	vh=sh/tiles;
	video.setSize(vw, vh);
}
addEventListener(Event.ENTER_FRAME, onframe);
function onframe(event:Event):void {
	for (var i:uint=0; i

Hope you liked my first actionscript post.

Edit: I didn't forget the beginBitmapFill method, but the project started a little different (not all the tiles was identical) and so I left the manual loop. In a few times I'll post the beginBitmapFill version for performance comparison.

9 Comments
Newer Posts »