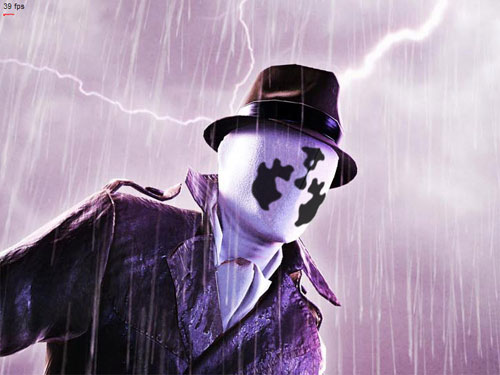
Everybody knows about Rorschach inkblot tests, and they always charmed me… It’s like looking clouds and recognizing different shapes.
However I must admit the real turn on came after watching Watchmen the movie. Seeing those animated inkblots on the face of the character symbolically named Rorschach is something really fascinating. So here we are, after about an hour of coding fun this is what I came up with.

Click to start
Here after adding a cool persistence of the ink (call it motion blur if you like), and the face oval:

Click to start
How it’s made is quite simple:
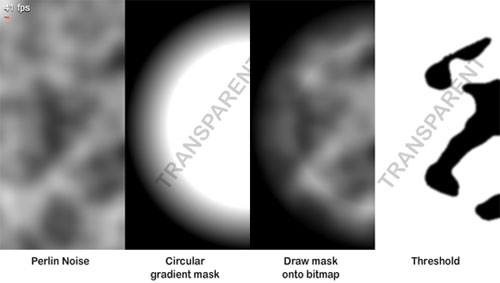
- perlinNoise a bitmapData
- draw a circular gradient mask (I used a beginGradientFill on a Shape/Sprite)
- BitmapData.draw() the mask onto the perlinNoise bitmapData
- threshold
- (optional) a little blur to simulate antialias
Since a picture is worth a thousand words:
Click to see it moving
I’ve built a class to do this easily. Six parameters are optional to instance it:
public function Rorschach(w:uint=400, h:uint=400, mirror:Boolean=true, seed:uint=0, ovalClass:Class=null, ovalScale:Number=1, ovalYOffset:Number=0)
ovalClass is the (optional) reference to the class containing the face background.
So the usage is very simple, here an example:
import com.oaxoa.fx.Rorschach;
addChild(new Rorschach(300,300));
//addChild(new Rorschach(300,300,true,0,blankMaskImage, 1.2, -20));
Download Rorschach class for your experimentation pleasure.
All nice, but the aim of this simple experiment is seeing Rorschach animated face in action so here we go… we will be using this class in a practical example.
To simulate 3D volume and perspective we need flash CS4 (or any 3D engine):
we create a MovieClip which has the Rorschach class instanced and a rectangular solid background for composition reference in it. Then we set layer visibility to wireframe and add another instance to the stage, which is flipped horizontally.
Just position the two instances using 3D rotations and we are ready.
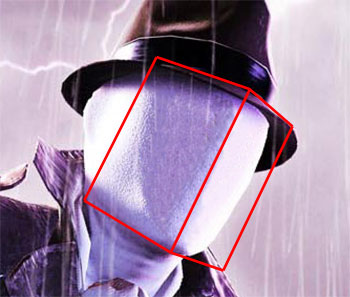
Just build et voilà!
Click to start
Rorschach’s Journal. October 12th, 1985. Dog Carcass in alley this morning, tire tread on burst stomach. This city is afraid of me. I have seen its true face. The streets are extended gutters and the gutters are full of blood and when the drains finally scab over, all the vermin will drown. The accumulated filth of all their sex and murder will foam up about their waists and all the whores and politicians will look up and shout ‘Save us!’ And I’ll look down, and whisper ‘no.’
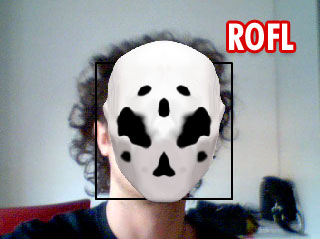
The last (and D-E-F-I-N-I-T-I-V-E!  ) usage for this is apply it to a realtime webcam face detection algorithm. I used this originally created by Ohtsuka Masakazu and optimized by Mario Klingemann. The result is totally weird (don’t expect photoreal hollywood effect LOL) but it’s funny, even if the face detection algorithm is not perfectly smooth.
Have fun being the definitive comics anti-hero:
Click to start