Hi there, back from an awesome week in Playa del Carmen Mexico… the most incredible vacation ever had. I’ll not post about this holiday (is or isn’t this a technical blog?). So in this last day before going back to work, I am here to post my 25lines contest and my four twittercoding entries.
25lines.com contest
Sadly 25lines.com is dying just after a couple of editions, I really enjoy this kind of stuff, but unfortunately after the first (december ’08) edition entries count started to diminish. I am the one who contributed in this premature departure as I entered only the first contest and then was to busy to work to contributing again.
However this was what I came with:
/**
 * 25-Line ActionScript Contest Entry
 *
 * Permission is hereby granted, free of charge, to any person obtaining a copy
 * of this software and associated documentation files (the "Software"), to deal
 * in the Software without restriction, including without limitation the rights
 * to use, copy, modify, merge, publish, distribute, sublicense, and/or sell
 * copies of the Software, and to permit persons to whom the Software is
 * furnished to do so, subject to the following conditions:
 *
 * The above copyright notice and this permission notice shall be included in
 * all copies or substantial portions of the Software.
 *
 * THE SOFTWARE IS PROVIDED "AS IS", WITHOUT WARRANTY OF ANY KIND, EXPRESS OR
 * IMPLIED, INCLUDING BUT NOT LIMITED TO THE WARRANTIES OF MERCHANTABILITY,
 * FITNESS FOR A PARTICULAR PURPOSE AND NONINFRINGEMENT. IN NO EVENT SHALL THE
 * AUTHORS OR COPYRIGHT HOLDERS BE LIABLE FOR ANY CLAIM, DAMAGES OR OTHER
 * LIABILITY, WHETHER IN AN ACTION OF CONTRACT, TORT OR OTHERWISE, ARISING FROM,
 * OUT OF OR IN CONNECTION WITH THE SOFTWARE OR THE USE OR OTHER DEALINGS IN
 * THE SOFTWARE.
 */

 /*
 25 lines Voxel Landscape Engine by Pierluigi Pesenti
 info@oaxoa.com

http://blog.oaxoa.com/

 */

// 3 free lines! Alter the parameters of the following lines or remove them.
// Do not substitute other code for the three lines in this section
[SWF(width=512, height=400, backgroundColor=0x7ddafd, frameRate=31)]
stage.align = StageAlign.TOP_LEFT;
stage.scaleMode = StageScaleMode.NO_SCALE;
// 25 lines begins here!
var paletteMap:Array=[13209,13465,13722,14235,14492,14749,15262,15519,16032,16288,16545,17058,17315,17572,18085,18342,18855,19111,19368,19881,20138,20395,20908,21165,21678,21934,22191,22704,22961,23218,23731,23988,24501,24757,25014,25527,25784,26041,26554,26811,27324,27580,27837,28350,28607,28864,29377,29634,30147,30403,30660,31173,31430,31687,32200,32457,32970,33226,33483,33996,34253,34510,35023,35280,35793,36049,36306,36819,37076,37333,37846,38103,38616,38872,39129,39642,39899,40156,40669,40926,106975,3322853,6604267,9820402,13101816,16383487,16119793,15856100,15658199,15394506,15196605,14671798,14212528,13753258,13293987,12834973,12375703,11916433,11457162,10997892,10538878,10014072,9554801,9095531,8636261,8177247,7717976,7258706,6799436,6340165,5881151,5356345,4897075,4437804,3978534,3519520,3060250,2600979,2141709,1682439,1223425,1223169,1288706,1353987,1419524,1484804,1550341,1615878,1681159,1746695,1811976,1877513,1943050,2008330,2073867,2139148,2204685,2269965,2335502,2401039,2466320,2531856,2597137,2662674,2728211,2793491,2859028,2924309,2989846,3055126,3120663,3120664,3185945,3251481,3316762,3382299,3447836,3513116,3578653,3643934,3709471,3774751,3840288,3905825,3971106,4036642,4101923,4167460,4232997,4298277,4363814,4429095,4494632,4559912,4625449,4690986,4756267,4821803,4887084,4952621,5018158,5214768,5411635,5608501,5805112,6001979,6198845,6460992,6657858,6854725,7051592,7248202,7445069,7641935,7904082,8100949,8297815,8494426,8691292,8888159,9150562,9347172,9544039,9740905,9937516,10134383,10331249,10593396,10790262,10987129,11183996,11380606,11577473,11774339,12036486,12233353,12430219,12626830,12823696,13020563,13282966,13349274,13415583,13481892,13613736,13680045,13746354,13812663,13944763,14011072,14077381,14143690,14275534,14341843,14408152,14540253,14540253,14540253,14540253,14540253,14540253,14540253,14540253,14540253,14540253,14540253,14540253,14540253,14540253,14540253,14540253,14540253,14540253,14540253,14540253,14540253];
var offs:Array=[new Point(0,0),new Point(0,0),new Point(0,0),new Point(0,0)];
var bdHeight:BitmapData=new BitmapData(256*2,256,false);
var bdColor:BitmapData=new BitmapData(256*2,256,false);
var bdNoise:BitmapData=new BitmapData(256*2,256,false);
var bdOutput:BitmapData=new BitmapData(256, 256, false);
addChild(new Bitmap(bdOutput));
Bitmap(getChildAt(0)).scaleX=Bitmap(getChildAt(0)).scaleY=2;
addEventListener(Event.ENTER_FRAME, function(event:Event):void {
	offs[0].x=offs[1].x=offs[2].x=offs[3].x=offs[0].x-(256-mouseX)/20;
	offs[0].y=offs[1].y=offs[2].y=offs[3].y=offs[0].y+(200-mouseY)/20;
	bdHeight.perlinNoise(150, 150, 3, 5, false, true, 7, true, offs);
	bdColor.copyPixels(bdHeight, bdHeight.rect, new Point(0,0),bdHeight);
	bdHeight.threshold(bdHeight, bdHeight.rect, new Point(0,0), "<", 0xff555555, 0xff555555);
	bdNoise.perlinNoise(5, 5, 1, 5, false, true, 7, true, offs);
	bdColor.paletteMap(bdColor, bdColor.rect, new Point(), paletteMap, [], []);
	bdColor.draw(bdNoise, null, new ColorTransform(1,1,1,.2), BlendMode.OVERLAY);
	bdOutput.fillRect(bdOutput.rect, 0x7ddafd);
	for (var i:int=0; i<256; i++) {
		for (var j:int=0; j<256*2; j++) {
			for (var k:int=0; k<3; k++) {
				if (bdOutput.getPixel(256/2+(j-256)*(120/(120+i)),50+((-bdHeight.getPixel(j,i)/(0xffffff/125)+200)*(120/(120+i)))+k)==0x7ddafd) {
					bdOutput.setPixel(256/2+(j-256)*(120/(120+i)),50+(((-bdHeight.getPixel(j,i)/(0xffffff/125)+200)*(120/(120+i)))+k), bdColor.getPixel(j, i));
				} else {
					break;
				}
			}
		}
	}
});
// 25 lines ends here!
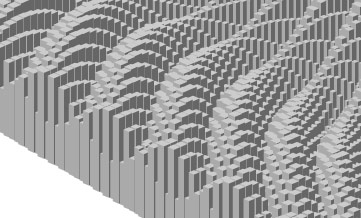
Which renders like this:
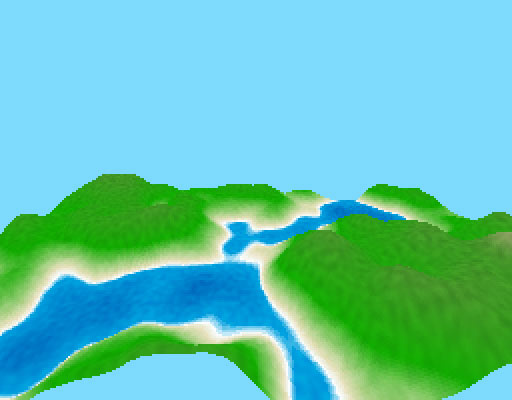
Yeah, yeah, know what u thinking: "He repacked the same old stuff of previous "voxels landscape" posts in 25 lines and submit to the contest! Booo".
You're right, but compacting that code in 25 lines was not that easy, and most of all this has dinamically generated map and not bitmap based like the voxels landscape post... lakes are rendered flat on the surface but still has depth gradients, there's a noise filter on the surface to mimic lesser hue variations and the loss of speed compared to the "unpacked" version is visible but not drastical.
Tweetcoding
See the winners, runners-up and mentions here.
After preparing four tweetcoding entries (140 chars only) going back to 25 lines of code would feel like absolute freedom. 140 chars is less than a sms, and as3 is quite verbose for some things. Thankfully the other 140 chars of (common) gimmick code made this contest possible.
The gimmick code:
g=graphics;
mt=g.moveTo;
lt=g.lineTo;
ls=g.lineStyle;
m=Math;
r=m.random;
s=m.sin;
i=0;
o={};
function f(e){
// paste your 140 chars here
}
addEventListener("enterFrame",f);
Alien lifeform
Mouse interactive, move mouse left/right to change the shape.
Big part of the code used to cycle colors, if you wait some minutes you will see cycling all the rgb colors. Some shape displays really fun colors pattern.
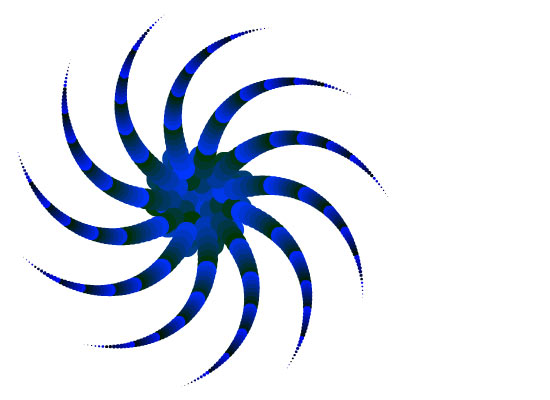
a=mouseX;x=y=200;i+=.01;g.clear();for(c=600;c--;) {g.beginFill(c*i);d=m.sqrt(m.abs(s(i)*600-c))*8;g.drawCircle(s(1.6-c*a)*d,s(c*a)*d,c/50);}
Rotating black & white alien lifeform (variation)
Mouse interactive, move mouse left/right to change the shape.
Sacrified the color cycling and implemented a simple 3d spinning. All the color fill is black, with a single beginFill to display the NAND effect very trendy in this contest because very cheap.
This got a notable mention...  thank you guys. However the first version with color cycling has been more challenging for me and is still my favorite.
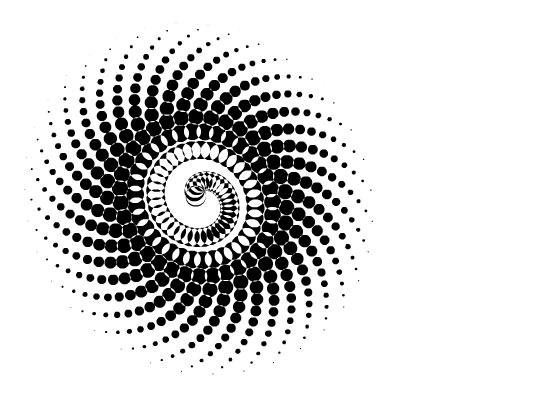
a=mouseX/999;x=y=200;i+=.01;g.clear();g.beginFill(0);for(c=500;c--;) {d=m.sqrt(m.abs(s(i)*500-c))*8;g.drawCircle(s(i-c*a)*d,s(c*a)*d,c/50);}
Oh no! My f****** horn!
Not interactive. Just look at it if you like.
Not much to say here, just a credit to the movie "Tenacious D and the Pick of Destiny" for the title and inspiration.
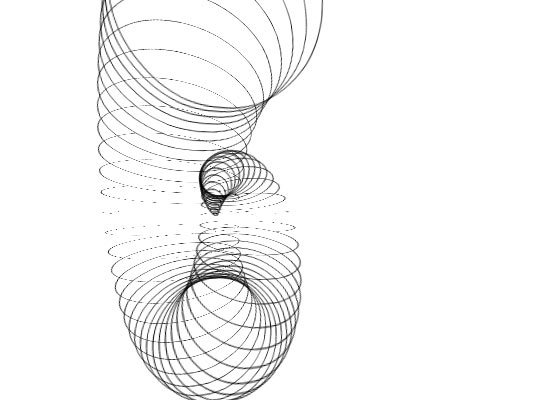
i+=4;if(i<220) {m=addChild(new Sprite);m.rotationX=i*2;k=m.graphics;k.lineStyle(1);k.drawCircle(0,i,i/2);x=y=i;}rotationY+=2;rotationX+=.9
Numeric sequence spiral
Not interactive.
Ok, ok, the sequence sucks (multiples of 8 are displayed). Wanted to have a Fibonacci one but too much code needed for the sequence to leave some spare char for the spiral. Number are interval created and the place to form a 3D spiral which is sine spinning slowly.
Totally lame here cause numbers are continuosly created and never removed, so after a minute or so, better you close the window before looking at your CPU freezing
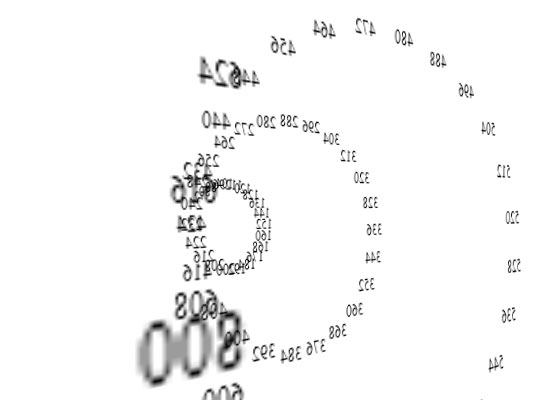
if(i%8==0) {t=addChild(new TextField);t.text=i;t.x=s(i/30)*i/4;t.y=s(1.6-i/30)*i/4;t.z=i/2;}rotationY=s(i++/99)*150;x=y=200
Don't forget to leave a comment if you find this code and examples someway useful.
Ciaooooooooo