Google Translate goes realtime… -_-
Just a quick (non-technical) post, but I cannot resist… Ok, Google translate introduces a realtime translation feature as highlighted as every new Google feature by billions of blogs (I saw it here: http://mashable.com/2009/11/16/google-translate-update/), but where is the GTranslate database taken from?
Does Anyone know? I do…
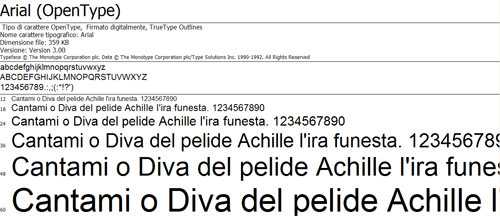
The Google Translate source database is… Windows Font Viewer!
Any other way to explain how is it possible that writing:
“a quick brown fox”
is translated in
“uno Cantami o Diva” (literally: “one Sing, O goddess”)
For those not into Greek epic poems translated in Italian, this is the beginning of the Homer’s Iliad which in my language reads:
Cantami, o Diva, del Pelìde Achille
l’ira funesta che infiniti addusse
lutti agli Achei, molte anzi tempo all’Orco
generose travolse alme d’eroi,
e di cani e d’augelli orrido pasto
lor salme abbandonò (così di Giove
l’alto consiglio s’adempìa), da quando
primamente disgiunse aspra contesa
il re de’ prodi Atride e il divo Achille.
E qual de’ numi inimicolli?
So how is it possible that a brown fox becomes a singing Goddess? I couldn’t remember but then I realized that the beginning of that poem is used by the Italian version of Windows in the font viewer to preview fonts!
So “A quick brown fox jumped over a lazy dog” (which is used in the English version since it contains every letter of the alphabet –a pangram) according to GTranslate in Italian should be translated with the beginning of a classical piece of literature… just because it’s another common pangram (almost)).
Obviously the magic doesn’t end here: just change “a quick brown fox” in “A quick brown fox” (with capital A) and the result is “Una volpe veloce” (correct)…
or remove the article: “quick brown fox” and the result is “quick brown fox” (not translated at all)!
I can understand translating from english to japanese (which are structurally completely different languages) back and forth can produce funny idiosyncrasies as seen on Translation Party but Italian is more similar and “quick”, “brown” and “fox” are common words learned at the first grade during the English lessons.
So I never wrote a dictionary db or algorithm and I am not so sure I could do better, but Google surely can, and first things should come first.