Browsing the archives for the classes category.


Actionscript 3 – as3 | Rorschach mask (realtime animated inkblots)

actionscript 3, BitmapData, classes, fluids, fun, morphing, perlinNoise, simulation, threshold

Everybody knows about Rorschach inkblot tests, and they always charmed me… It’s like looking clouds and recognizing different shapes.

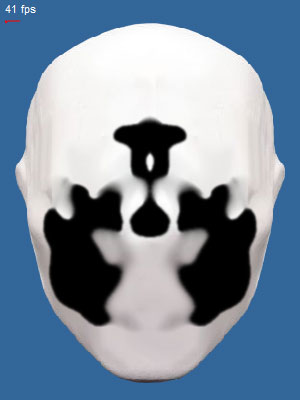
However I must admit the real turn on came after watching Watchmen the movie. Seeing those animated inkblots on the face of the character symbolically named Rorschach is something really fascinating. So here we are, after about an hour of coding fun this is what I came up with.


Click to start

Here after adding a cool persistence of the ink (call it motion blur if you like), and the face oval:


Click to start

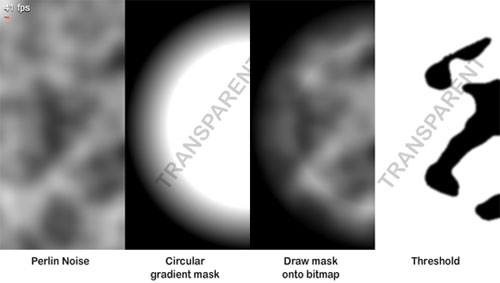
How it’s made is quite simple:

- perlinNoise a bitmapData
- draw a circular gradient mask (I used a beginGradientFill on a Shape/Sprite)
- BitmapData.draw() the mask onto the perlinNoise bitmapData
- threshold
- (optional) a little blur to simulate antialias

Since a picture is worth a thousand words:


Click to see it moving

I’ve built a class to do this easily. Six parameters are optional to instance it:

public function Rorschach(w:uint=400, h:uint=400, mirror:Boolean=true, seed:uint=0, ovalClass:Class=null, ovalScale:Number=1, ovalYOffset:Number=0)

ovalClass is the (optional) reference to the class containing the face background.

So the usage is very simple, here an example:

import com.oaxoa.fx.Rorschach;
addChild(new Rorschach(300,300));
//addChild(new Rorschach(300,300,true,0,blankMaskImage, 1.2, -20));

Download Rorschach class for your experimentation pleasure.

All nice, but the aim of this simple experiment is seeing Rorschach animated face in action so here we go… we will be using this class in a practical example.

To simulate 3D volume and perspective we need flash CS4 (or any 3D engine):
we create a MovieClip which has the Rorschach class instanced and a rectangular solid background for composition reference in it. Then we set layer visibility to wireframe and add another instance to the stage, which is flipped horizontally.
Just position the two instances using 3D rotations and we are ready.
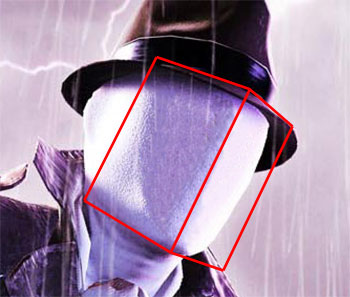
Just build et voilà!


Click to start

Rorschach’s Journal. October 12th, 1985. Dog Carcass in alley this morning, tire tread on burst stomach. This city is afraid of me. I have seen its true face. The streets are extended gutters and the gutters are full of blood and when the drains finally scab over, all the vermin will drown. The accumulated filth of all their sex and murder will foam up about their waists and all the whores and politicians will look up and shout ‘Save us!’ And I’ll look down, and whisper ‘no.’

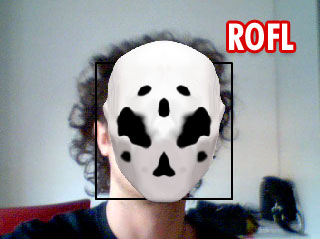
The last (and D-E-F-I-N-I-T-I-V-E! :-D ) usage for this is apply it to a realtime webcam face detection algorithm. I used this originally created by Ohtsuka Masakazu and optimized by Mario Klingemann. The result is totally weird (don’t expect photoreal hollywood effect LOL) but it’s funny, even if the face detection algorithm is not perfectly smooth.

Have fun being the definitive comics anti-hero:


Click to start

6 Comments

Actionscript 3 – as3 Lightning / Thunderbolt / Electric discharge Class

actionscript 3, algorithms, BitmapData, classes, fun, Math, morphing, perlinNoise, simulation

Finally here we come!

Yup, sry for the delay, I’ve had a lot of work recently.

I have prepared three demos and a publishable (but far from perfect and not yet documented) class. The demos are FLA based… you can find the timeline code to assemble the demos at the bottom of the post. I’ll publish some documentation in the next days, so until then just look at the demos’ code to unserstand the basic of the class usage.

Download Lightning classes

Demo N°1:
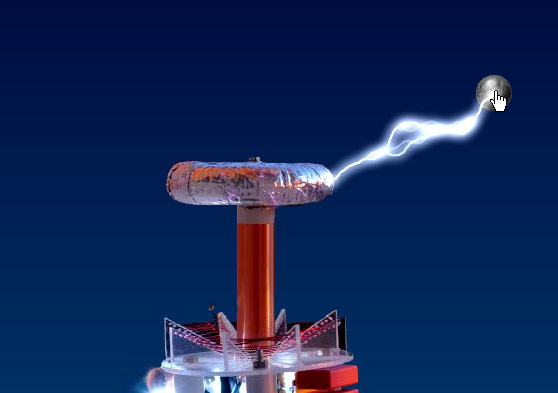
This demo shows the two different behaviours the class can mimic: Electric discharge/beam or lightning. Drag the ball near or far to the coil to see different behaviors.


Click to start

Demo N°2:
This demos show the maxLength and maxLengthVary properties in action.
Bring the fingers near to the plug to have continuos electricity. Bringing the hand far from the plug lowers the discharge probability. Reaching the max distance simply disables it.


Click to start

Demo N°3:
This demo is a good reason for the publishing delay :P

A nice sandbox to play with (some of) the properties.
The class is recursive to create children so many properties have also a decay twin property which rule how the property is passed to children.
As instance if you set a childrenMaxCount = 6 to the main Lightning instance it will have a maximum of 6 direct children. Its children will have a childrenMaxCount value which depends on the main instance childrenMaxCount and childrenMaxCountDecay.
So if you set childrenMaxCount = 6 and childrenMaxCountDecay = .5 the children of the main instance will have childrenMaxCount = 3.
If you set childrenMaxCount = 6 and childrenMaxCountDecay = 0 the children of the main instance will have childrenMaxCount = 6 (no decay).

This value can be very useful to optimize the speed of execution cause smaller branches don’t need many children or many steps of detail.


Click to start

Ok, I’m too tired to write more. I’ll publish some documentation in the next days.
Feel free to ask everything question you can have in the comments, and as usual if you like this stuff scream it in the comments!

Demos’ code after the break. Waiting for your comments I will surf through the website of fatcow and see if they have any good hosting plans.

Continue Reading »

87 Comments

Actionscript 3 | Speedcoding video – session #1: Black Branches

actionscript 3, algorithms, BitmapData, classes, fun, Math, perlinNoise

Yesterday night I wanted to have some “no-purpose coding session” and thought it was a nice idea to record the session and do a speedcoding video. The original video has been collapsed from 45 minutes to 3 minutes circa.

The main concept is once again based on perlinNoise which (I am sure you already guessed) is something I do like very much. So please start call me “The PerlinNoise Guy” or “Perlinator”. :-D

So this is my first speedcoding video (be sure to look at it in high quality):

Here’s the interactive demo:

400
Click to launch. Move mouse (x position) to change smoothness (my favourite values are around 100)

The code consist on a Branch.as class file (click to download) and some timeline code to assemble the demo:

import com.oaxoa.fx.Branch;

const w:uint=stage.stageWidth;
const h:uint=stage.stageHeight;

var ct:ColorTransform=new ColorTransform(1,1,1,1,1,1,1);
var renderView:BitmapData=new BitmapData(w, h, true);
var bmp:Bitmap=new Bitmap(renderView);
addChild(bmp);

var tf:TextFormat=new TextFormat("_sans", 16, 0, true);
var label:TextField=new TextField();
label.width=400;
label.defaultTextFormat=tf;
addChild(label);

var timer:Timer=new Timer(10);
timer.addEventListener(TimerEvent.TIMER, ontimer);
timer.start();

function ontimer(event:TimerEvent):void {
	addNew();
}
function addNew():void {
	label.text="Smoothness: "+String(mouseX-w/2);
	var tt:Branch=new Branch(mouseX-w/2);
	tt.x=stage.stageWidth/2;
	tt.y=stage.stageHeight/2;
	tt.addEventListener(Event.COMPLETE, oncomplete);
	addChild(tt);
	renderView.colorTransform(renderView.rect, ct);
}
function oncomplete(event:Event):void {
	var t:Branch=event.currentTarget as Branch;
	var matrix:Matrix=new Matrix();
	matrix.translate(t.x, t.y);
	renderView.draw(t, matrix);
	removeChild(t);
	t.removeEventListener(Event.COMPLETE, oncomplete);
	t=null;
}

I didn’t forget about the lightning class part 3 that I will publish soon :)

As usual if you liked this drop a line in the comments.
Ciao

11 Comments

Actionscript 3 Basic Tutorial – Easiest way to do easy stuff (Starfield class)

actionscript 3, algorithms, BitmapData, classes, fun, Particles, perlinNoise

I don’t usually post about two lines of code snippets, or about workarounds to that damn bug or about basic tutorials for beginners. I honestly haven’t enough time and will to post on a daily basis. Usually I use this blog to mantain me focused on a single project I find interesting and take it to the end (not a really working however :-P ).

Logic comes first, code is the last step

So what about the title? What’s the the perfect beginner but somehow satisfying tutorial?
Answer snow/rain/starfield and you got it, and here we have a basic starfield class tutorial.

However the main reason I am posting this is not about the 30-40 code lines involved in rendering a random starfield but make you stop a moment and think about a possible easier way to do what you are doing.
I’ll try to be clearer: this morning I was working on a flash animation and just wanted to place a background starfield on my bucholic landscape view. So I quickly created the class but was missing something… off course a starfield is not cool if stars don’t twinkle (winkle, scintillate
shine… vary in light intensity etc.). So I started to recall the milions of experiments like this I did years ago in Actionscript 1 and ok… the first answer was something like:

  • Generate every star as a sprite/movieclip (possibily in a main container)
  • list the instance in some array, dictionary (whatever you prefer)
  • to make ‘em twinkle, at every frame, do a for loop on every instance and vary its alpha with some some increment/decrement/sine calculation (o simply randomize it if you are lazy)

or you can have a Star class togheter with the Starfield class and let the Star class think about everything, so it creates its EnterFrame event to start twinkling when added (but it’s always a bad idea to have hundres of EnterFrame events, when you can have only one in the main class.

But…

Flash teach me that there are always many options to get to the same results (that is what I really like most about flash developing), AND… that bitmap filters and blend modes are a gift to hardcore developers with tremendous possibilities.

So.. do we really want a subtle background effect to keep 50% of the CPU? I don’t.

Continue Reading »

18 Comments

Actionscript 3 – PixelMorphing Class (now with source code)

actionscript 3, advanced image editing, algorithms, BitmapData, classes, fun, morphing, Particles

Updated on 04/27/2009: Class with some improvements to skip transparent pixels. The two images should however share the same amount (or similar) of visible pixels.
Lot of space for improvements here, if someone want to contribute very appreciated.

Ok, lot of time passed since I posted my PixelMorphing class experiment.
Seemed to me that post passed quite unobserved but then I received a lot of feedback and e-mail asking to share the source code.

Well, the first time I wanted to speed up posting and do further experimentation/optimization so I din’t prepare the source but since the main believe of this blog is that if someone ask for code I release it, here we are. Optimization still not done… I am a lazy one, so if someone want to help improve it is really welcome.

Now the steps to play with it:

  1. Download the PixelMorphing class
  2. Use it with this code:
import com.oaxoa.fx.PixelMorphing;
var pm:PixelMorphing=new PixelMorphing(pic1, pic2, 200);
addChild(pm);

pm.start();
//pm.reset();

or certainly you can place some buttons or some combo and wait for some event for it to start or reset. The main code of the previous post is this:

Continue Reading »

19 Comments
« Older Posts